前端部分的交互算是完成了,但总差点意思,没有真正的接口返回数据,还是模拟的不到位….😑
一、前言
我也想接入下大模型!!! 本来想偷偷调用公司的大模型接口的,但是需要登陆获取 appName 和 sessionId,有点小麻烦,所以还是在各大社区光了一大圈….
👀 好多家都是需要付费的(那就不再考虑之内),注意到 gemini 可以免费调用,尝试了一下,能拿到数据,但是不太稳定,而且用法也不太直观,遂放弃…
后面决定选择了 ———— 科大讯飞。Spark Lite 通过实名认证后,可以免费调用(无限量 token),不过没那么「智能」,更像个你问我答的「检索」机器人,不过这也够了。
二、接入科大讯飞
1. 准备
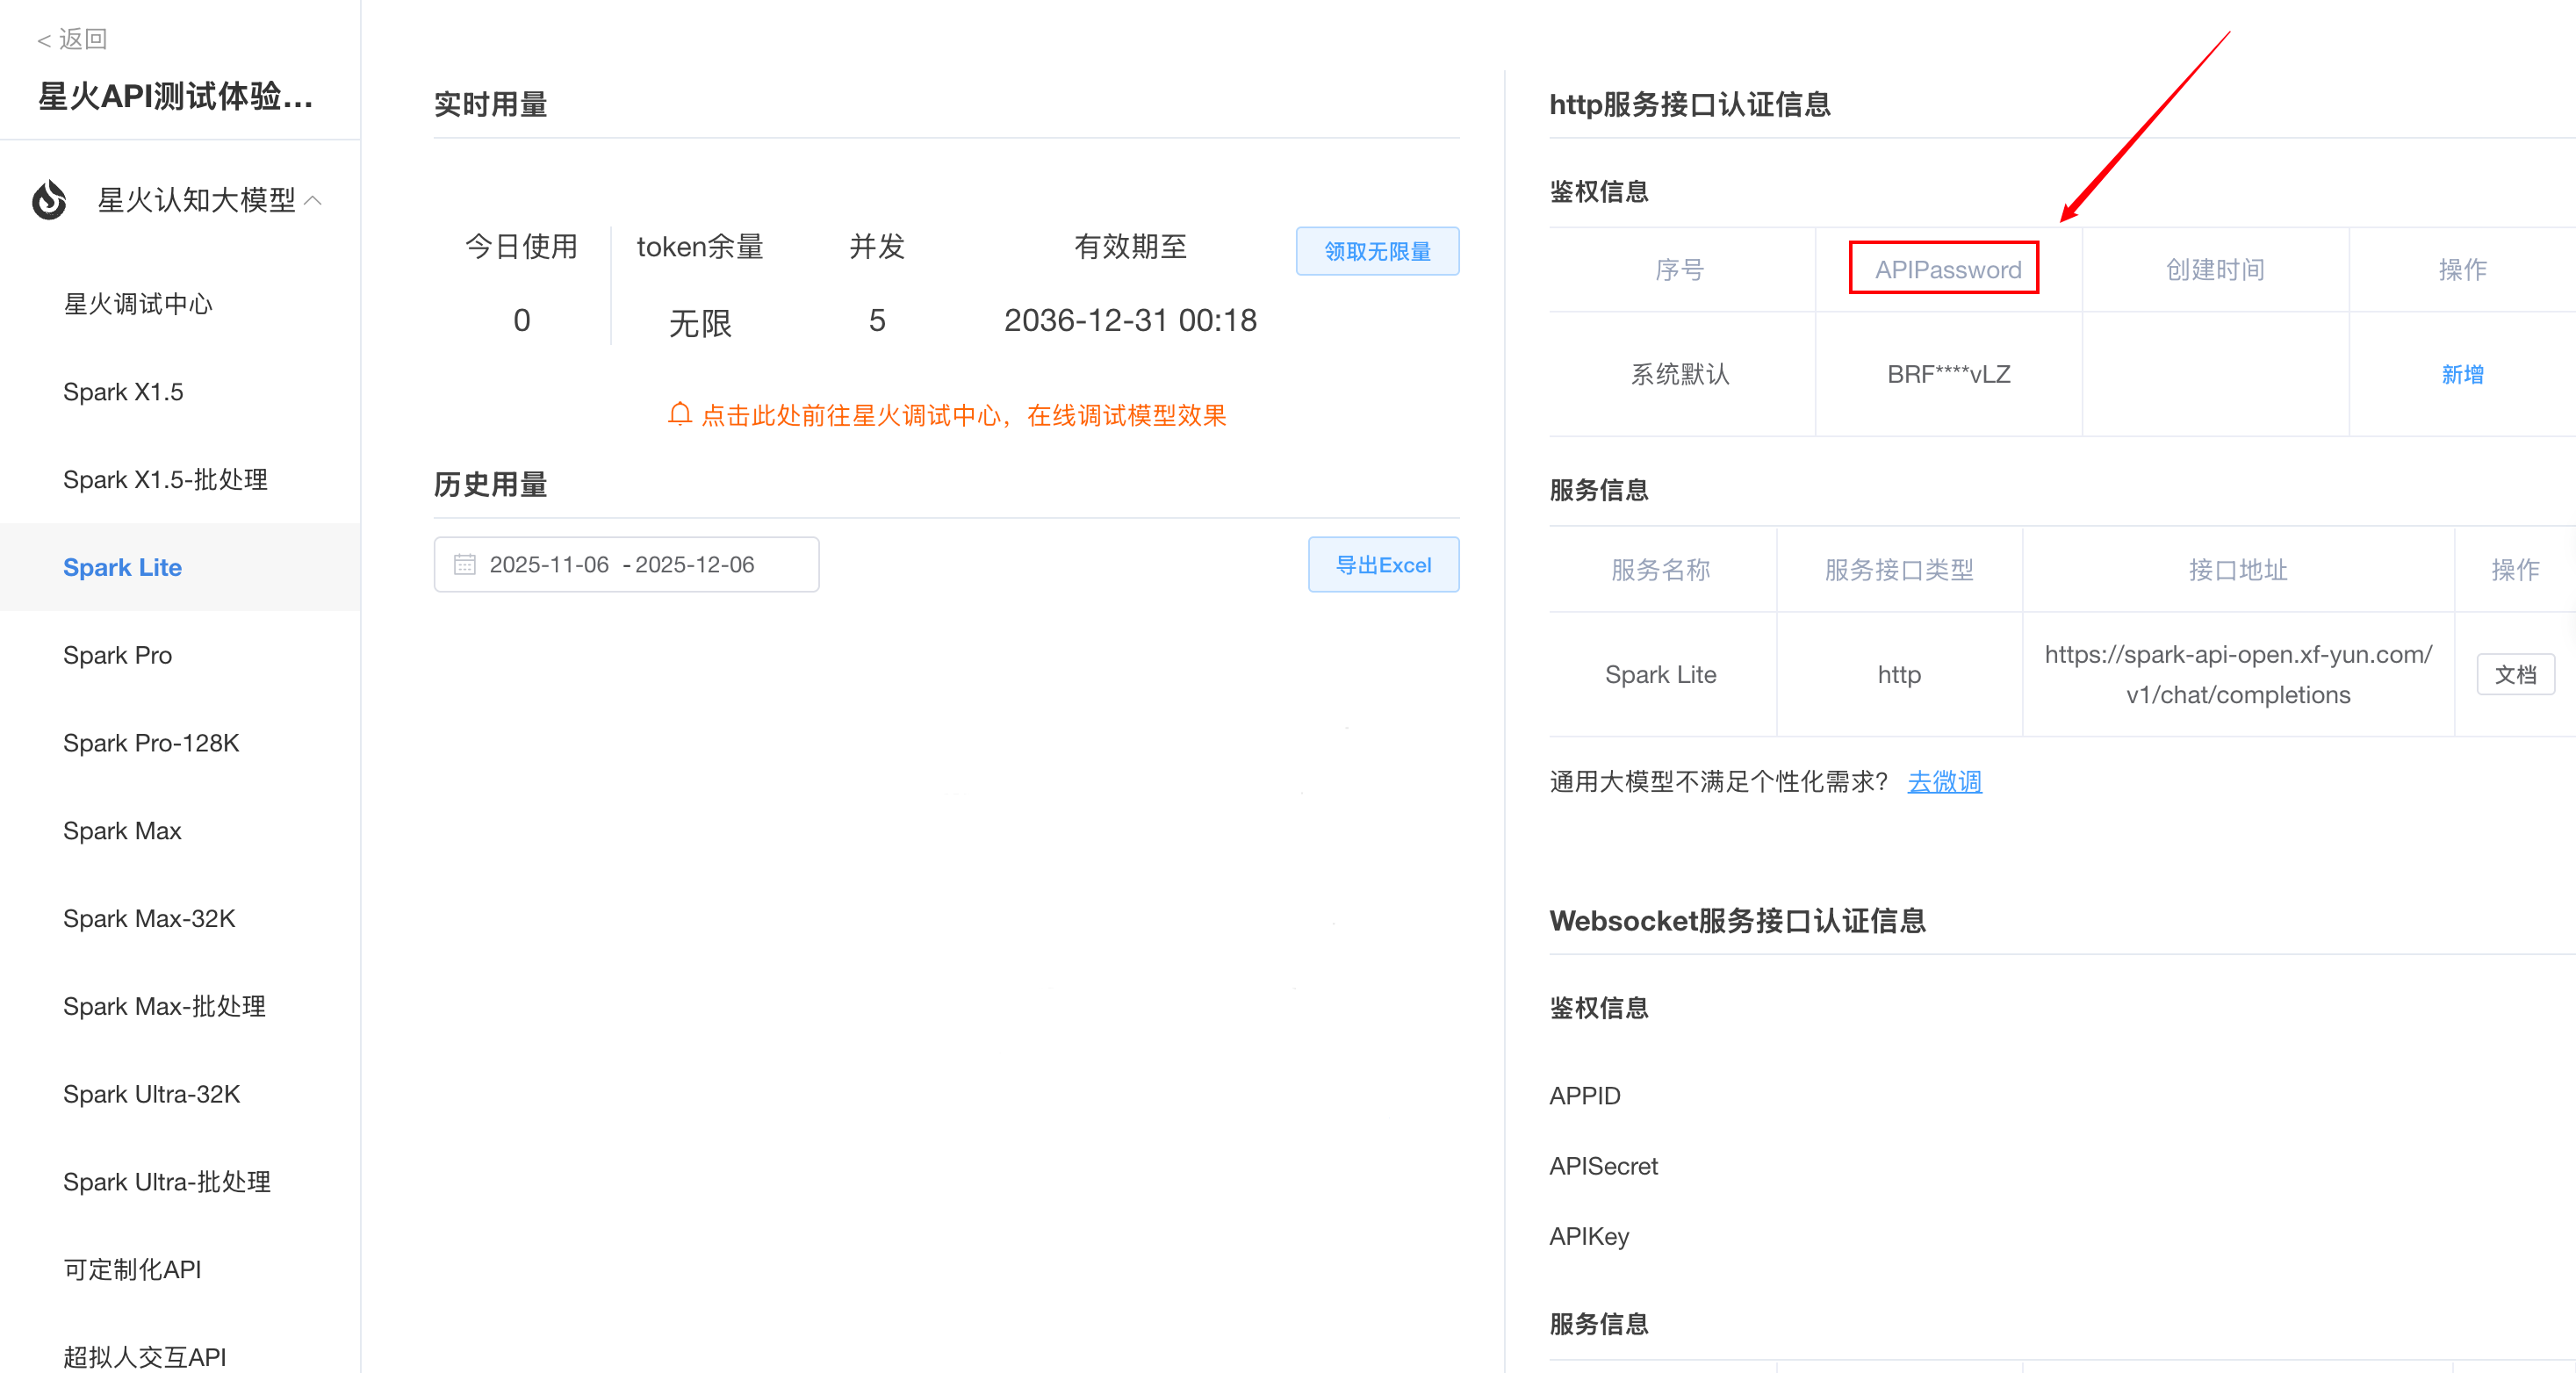
在 科大讯飞控制台 中,创建应用,并获取 APIPassword。
2. 环境依赖
需要准备以下依赖:
node-fetch:用于发送 HTTP 请求,当然使用原生的fetch也可以readline:用于处理接口返回的数据流dotenv:用于加载环境变量
需要以下文件:
-
.env:存放环境变量1 2 3 4 5 6
URL=https://spark-api-open.xf-yun.com/v1/chat/completions APIKEY= 你的 APIPassword PORT=8080
- data/messages.json:存放聊天记录
- chat.js:各种接口函数
3. 实现流式数据接口
在 chat.js 中,编写以下代码:
1
2
3
4
5
6
7
8
9
10
11
12
13
14
15
16
17
18
19
20
21
22
23
24
25
26
27
28
29
30
31
32
33
34
35
36
37
38
39
40
41
42
43
44
45
46
47
48
49
50
51
52
53
import fetch from "node-fetch";
import readline from "readline";
import fs from "fs";
import path from "path";
import { fileURLToPath } from "url";
import dotenv from "dotenv";
dotenv.config({ path: ".env" });

const KEY = process.env.GEMINI_API_KEY; // 替换为你的有效Key
const URL = process.env.URL;

export const chatStream = async (messages, res) => {
  console.log(messages);
  const body = {
    model: "lite", // 示例,可换 spark-v3、spark-max、deepseek-r1 等
    user: "",
    messages: [messages],
    stream: true,
  };
  const response = await fetch(URL, {
    method: "POST",
    headers: {
      "Content-Type": "application/json",
      Authorization: `Bearer ${KEY}`,
    },
    body: JSON.stringify(body),
  });

  const rl = readline.createInterface({
    input: response.body, // Node.js Readable
    crlfDelay: Infinity,
  });
  rl.on("line", (line) => {
    line = line.trim();
    if (line.startsWith("data:")) {
      const jsonStr = line.replace(/^data:\s*/, "");
      if (jsonStr === "[DONE]") return;
      try {
        const data = JSON.parse(jsonStr);
        console.log(data.choices[0].delta);
        if (data.choices[0].delta.content) {
          res.write(JSON.stringify(data.choices[0].delta));
        }
      } catch (e) {
        // 忽略解析错误
      }
    }
  });
  rl.on("close", () => {
    console.log("✅ 流处理完成");
    res.end();
  });
};
拿到的 data.choices[0].delta 是这样的:
1
2
3
4
5
{ role: 'user', content: '你好啊' }
{ role: 'assistant', content: '你好' }
{ role: 'assistant', content: '!有什么' }
{ role: 'assistant', content: '我可以帮助你的' }
{ role: 'assistant', content: '吗?' }
以上使用的是
note-fetch,所以使用readline来处理数据流。
在 index.js 中,引入 chatStream 函数:
1
2
3
4
5
6
7
8
9
10
11
12
13
14
import { chatStream } from "./chat.js";

// 流式聊天
app.post("/api/chat/stream", async (req, res) => {
  try {
    const { messages } = req.body;
    if (!messages) {
      return res.status(400).json({ error: "message参数必填" });
    }
    await chatStream(messages, res);
  } catch (error) {
    console.error("API错误:", error);
  }
});
三、优化聊天交互
包括打断回复、保存记录及键盘等一些优化。
1. 数据格式
之前的数据结构是:{role:'sys',delta:'你好'},为了对标主流的 AI 的数据结构,改成:{role:'assistant',content:'你好'},注意把项目中涉及到该格式的,都全部替换,如ai聊天页面中的:
1
2
3
4
5
6
7
8
9
10
11
12
13
const onHandleChunk = (chunk) => {
  const { content, role = "assistant" } = chunk; // 设置默认 role 为 "assistant"
  if (typeof content === "string" && !content?.trim()) return;
  const last = chatList.value[0];
  if (last && last.role === role) {
    last.content += content;
  } else {
    chatList.value.unshift({
      content,
      role,
    });
  }
};
项目源代码中已全部替换。
2.获取聊天记录
在小程序端不做处理,依然是传统的传入分页的参数,如:
1
2
3
4
5
6
// 获取聊天记录
const result = await getMessage({
  page: pagination.value.page,
  pageSize: pagination.value.pageSize,
  userId: "xx123",
});
在 server 端,借用 messages.json 存储数据。
1
2
3
4
5
6
7
8
9
10
11
12
13
14
15
16
17
18
19
20
21
22
23
24
25
// chat.js

// 引入必要的模块
import fs from "fs";
import path from "path";
import { fileURLToPath } from "url";
import dotenv from "dotenv";
dotenv.config({ path: ".env" });

const __filename = fileURLToPath(import.meta.url);
const __dirname = path.dirname(__filename);
const filePath = path.join(__dirname, "data", "messages.json");

// 其他代码...

export const getMessage = async (params, res) => {
  const { page, pageSize } = params;
  const data = JSON.parse(fs.readFileSync(filePath, "utf8")).reverse();
  const total = data.length;

  const startIndex = (page - 1) * pageSize;
  const endIndex = startIndex + pageSize;
  const list = data.slice(startIndex, endIndex);
  res.json({ list, total, hasMore: endIndex < total });
};
3. 打断回复
说到保存记录,就要说到「打断回复」。上一节说到 保存记录与打断时机,这里明确了要既要「打断打字机回复」,又要「打断接口回复」,另要把当前实际显示的内容保存起来。
「打断接口回复」比较简单,就是调用一个「打断的接口」,后端处理就行。
现在要说的是打断打字机回复与保存记录。
上一篇说到, 在 ai-keyboard 组件中,当 is-replying 变化为 true 时,按钮切换为「打断」状态。
1
2
3
4
5
6
7
8
9
10
11
12
13
14
15
16
const emit = defineEmits(["send", "stop"]);
const sendMessage = () => {
  if (props.isReplying) {
    emit("stop");
    return;
  }
  if (!inputValue.value.trim()) {
    uni.showToast({
      title: "请输入内容",
      icon: "none",
    });
    return;
  }
  emit("send", inputValue.value);
  inputValue.value = "";
};
打断时,不执行发送逻辑,但是把「打断」的状态传递给父组件,在父组件中处理相应逻辑。
1
2
3
4
5
6
7
8
9
10
11
12
13
14
15
// 父组件
const isStop = ref(false);
const onStop = () => {
  isStop.value = true;
  // isReplying.value = false; // ❌ 不能执行
};

requestTask = wx.request({
  // 其他代码...
  complete: () => {
    console.log("⭕ 请求结束");
    currentReceivingId.value = null;
    isReplying.value = false; //  ✅ 在这里修改
  },
});
注意:不能直接改变回复状态,因为这时候只是说
我打断了,但实际上接口还在回复,如果这里修改了状态,那发送按钮就又可以发送了,就变成上一条消息还在回复,下一条消息又发送了。 打断回复的接口应该在这里调用,但还是不能直接改变状态,因为接口响应有延迟,所以应该在requestTask的complate里修改。
ai-sys-text 组件中,接收 isStop,然后终止打字,并抛出回调。
1
2
3
4
5
6
7
8
9
10
11
12
13
14
15
16
17
18
19
20
21
22
23
24
25
26
27
28
29
const emits = defineEmits(["stopSuccess"]);
const typingText = (text) => {
  if (!text) return;
  if (props.isStop) return; // 打断时,不执行打字机

  clearTimeout(timer);
  const step = () => {
    // 打断时,直接抛出回调
    if (props.isStop) {
      emits("stopSuccess", content.value);
      return;
    }
    isReplying.value = true;
    if (typingIndex.value < text.length) {
      content.value = text.slice(0, ++typingIndex.value);
      const completedContent = completeMarkdown(content.value);
      htmlContent.value = marked(completedContent);
      timer = setTimeout(step, 30);
    } else {
      // 打字完成后,标记不再需要打字效果,并抛出回调
      if (!props.isReceiving) {
        needTypingEffect.value = false;
        isReplying.value = false;
        emits("stopSuccess", content.value);
      }
    }
  };
  step();
};
通过以上处理,当「打断」时,不再接收父组件传入的内容,打字机函数也不执行,并抛出回调。打字机结束以后,也抛出回调。因此能及时的拿到当前已渲染的内容。
4. 保存记录
保存内容包括用户发送的内容和系统回复的内容。
在 sendMessage 函数中、在 stopSuccess 回调中,调用 saveMessage 函数,保存聊天内容。
1
2
3
4
5
6
7
8
9
10
11
12
13
14
15
16
17
18
const sendMessage = (message) => {
  isReplying.value = true;
  isWaiting.value = true;
  chatMessage.value = message;
  const obj = {
    id: Date.now(),
    role: "user",
    content: message,
  };
  addMessage(obj);
  saveMessage(obj); // 保存用户发送的内容
  onFetch();
};

const onStopSuccess = (text) => {
  const messages = { role: "assistant", content: text };
  saveMessage(messages); // 保存系统回复的内容
};
四、键盘上移
在 input 组件中,默认上推页面,adjust-position 为 true。如果为 false,键盘又会盖住输入框。
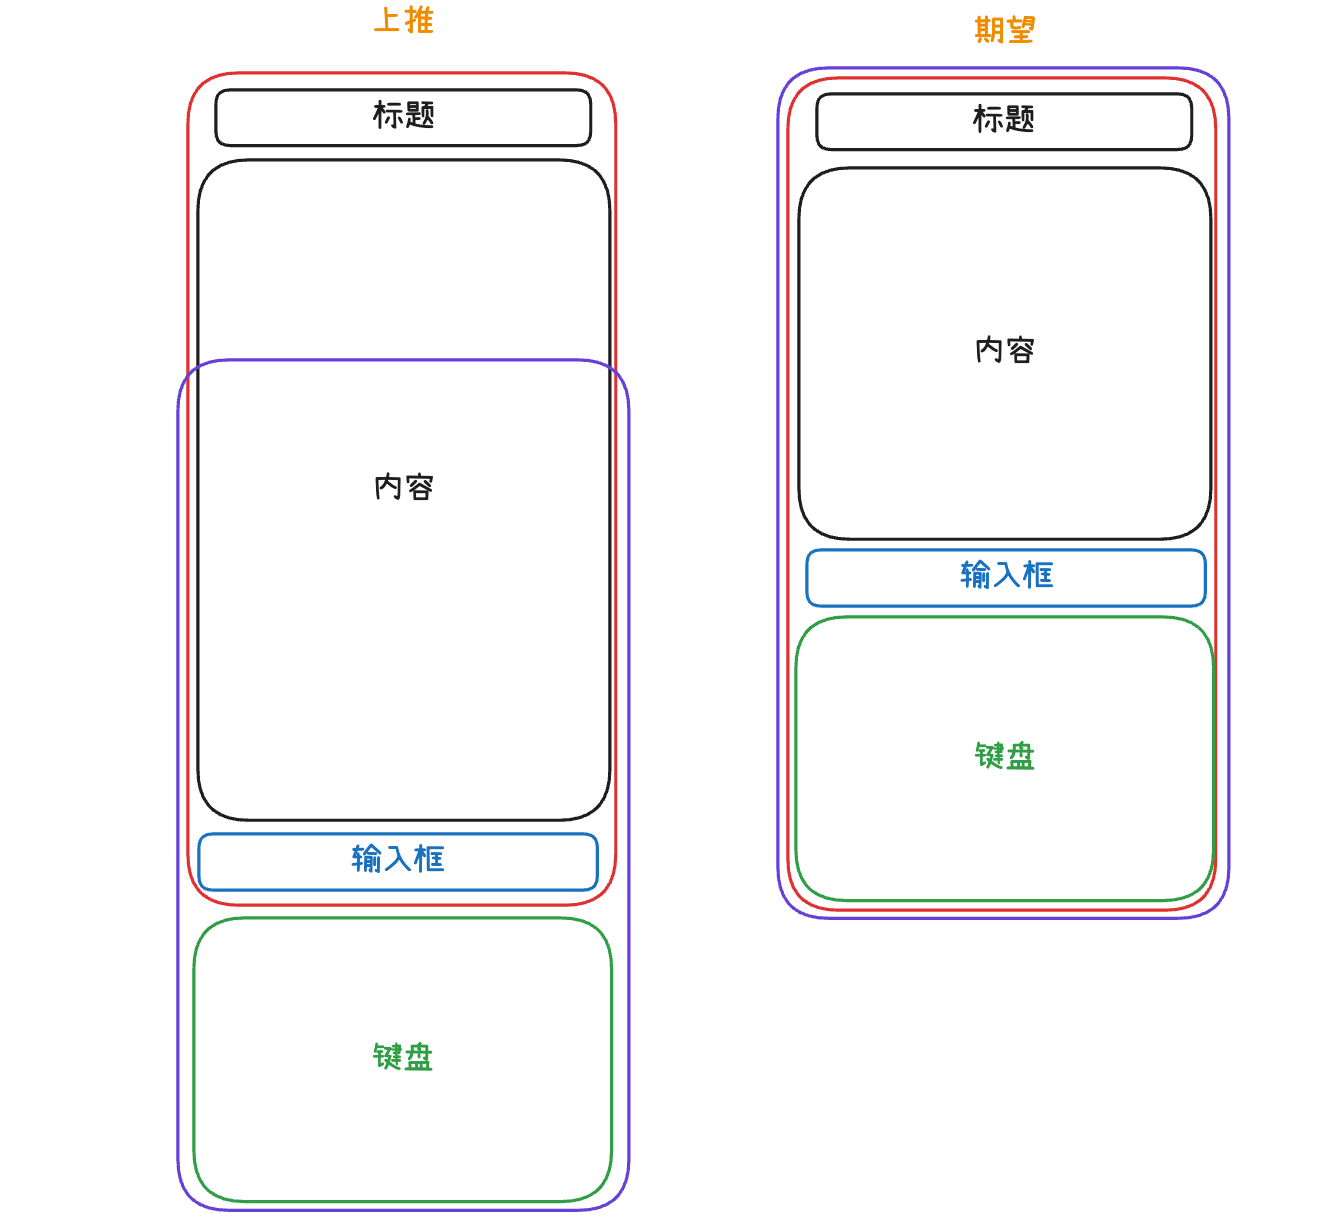
键盘上推会把页面推出容器,怎么调都不方便。通过观察「期望」效果,我们可以另辟蹊径:
把 adjust-position 设置为 false,禁止键盘上推页面,实际就是「键盘」定位在容器底部,盖住了页面的部分内容,那我们可以让ai-keybord 组件添加一个 padding-bottm,把键盘上移,留一部分空白给键盘,这样就完美解决了。
添加 @keyboardheightchange,监听键盘的高度变化。
1
2
3
4
5
6
7
8
9
const keyboardHeight = ref("");
const onKeyboardheightchange = (e) => {
  const height = e.detail.height ?? 0;
  if (height) {
    keyboardHeight.value = `calc(${height}px - env(safe-area-inset-bottom))`;
  } else {
    keyboardHeight.value = "0px";
  }
};
1
2
3
4
5
6
7
8
9
10
11
12
13
14
15
16
17
18
19
20
<template>
  <view class="ai-keyboard" :style="{ 'padding-bottom': `${keyboardHeight}` }">
    <view class="ai-keyboard__input">
      <input
        type="text"
        :focus="focus"
        placeholder="请输入内容"
        v-model="inputValue"
        @confirm="sendMessage"
        :adjust-position="false"
        @keyboardheightchange="onKeyboardheightchange"
        placeholder-style="color: #79A5BE;"
      />
      <view class="ai-keyboard__input-send" @click="sendMessage">
        <text class="iconfont icon-tingzhi" v-if="isReplying"></text>
        <text class="iconfont icon-send-s" v-else></text>
      </view>
    </view>
  </view>
</template>
五、效果
完善了「打断」接口,可见源代码。
效果如下: